Getting started with Django Celery and Redis
![]()
This is part 1 on how to get up and running with Django and celery. It's a fairly opinionated guide and represents what I consider to be the easiest approach.
To keep things simple, to start with we'll be using redis as our broker AND our results backend.
Initial Setup
Initialize a new Django project (I'm calling it blog)
django-admin startproject blog && cd blog
Once inside the project folder initialize a new Pipenv environment
pipenv shell
Install some necessary dependencies
pipenv install django celery[redis]
Note: I've included redis as an optionally celery dependency, to start with we'll be using redis to broker communication between Django <-> celery workers and to store the results of any tasks
Next we'll need to start an initial app (will be useful later):
pipenv run django-admin startapp posts
Then add the new app to the INSTALLED_APPS in blog/settings
 INSTALLED_APPS = [
     "django.contrib.admin",
     "django.contrib.auth",
     "django.contrib.contenttypes",
     "django.contrib.sessions",
     "django.contrib.messages",
     "django.contrib.staticfiles",
+    "posts.apps.PostsConfig",
 ]
We then need to run some standard Django post initialization setup, which is typically the same for all projects:
Run some initial migrations:
pipenv run ./manage.py migrate
Create a superuser account (in order to view the admin page)
pipenv run ./manage.py createsuperuser
Configuring Our Celery Application
Create a new file blog/celery.py and add the following code:
(this is stolen directly from the django-celery docs)
import os

from celery import Celery

# Set the default Django settings module for the 'celery' program.
os.environ.setdefault("DJANGO_SETTINGS_MODULE", "blog.settings")

app = Celery("blog")

# Using a string here means the worker doesn't have to serialize
# the configuration object to child processes.
# - namespace='CELERY' means all celery-related configuration keys
#   should have a `CELERY_` prefix.
app.config_from_object("django.conf:settings", namespace="CELERY")

# Load task modules from all registered Django apps.
app.autodiscover_tasks()


@app.task(bind=True)
def debug_task(self):
    print(f"Request: {self.request!r}")
Configure Celery Broker (redis)
Dev
 .
.
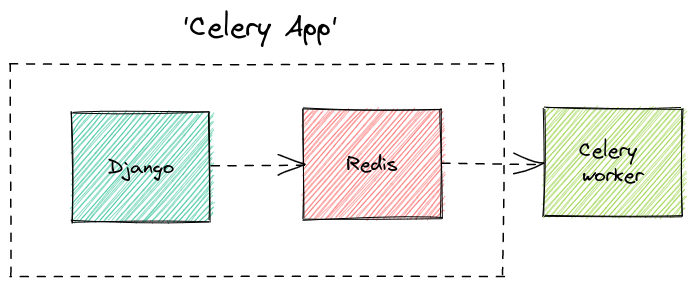
In our local development environment we'll have the following three things:
- one instance of Django running locally ./manage.py runserver,
- one instance of celery celery worker -A blog worker
- one instance of redis (running somewhere i.e: in a docker container)
Running all these things together can become cumbersome, thankfully there's a number of solutions out there to manage this complexity (which I hope to address in future articles).
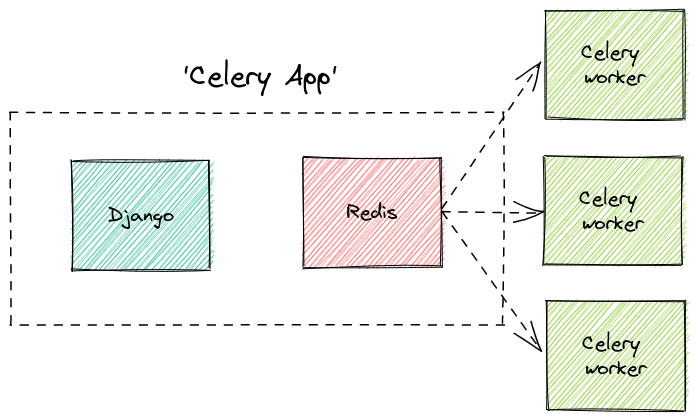
Prod
Unlike during development (where everything is running locally), in production there's a good chance that celery worker(s) may not be running on the same machine.
Furthermore you might even want to run multiple instances of celery. In this case celery will distribute tasks evenly amongst the worker pool.
Starting a Redis Instance
This next few steps of this tutorial assume you have an instance of Redis running somewhere
It doesn't particularly matter where/how you run your Redis instance, as long as you're able to connect to this instance from your machine.
Which option you choose will largely depend on your own project constraints and personal preferences. But to help I've presented a few possible options below.
Running Locally
If you want to run redis on your own machine official documentation.
Running within docker
Alternatively if you have docker installed, you can quickly spin up a containerised redis instance instead:
docker run --rm -d -p 6379:6379 redis
If your project uses docker-compose you can add a relevant entry in the docker compose file instead.
Using a managed instance
One option is to quickly spin up a free redis instance on console.upstash.com
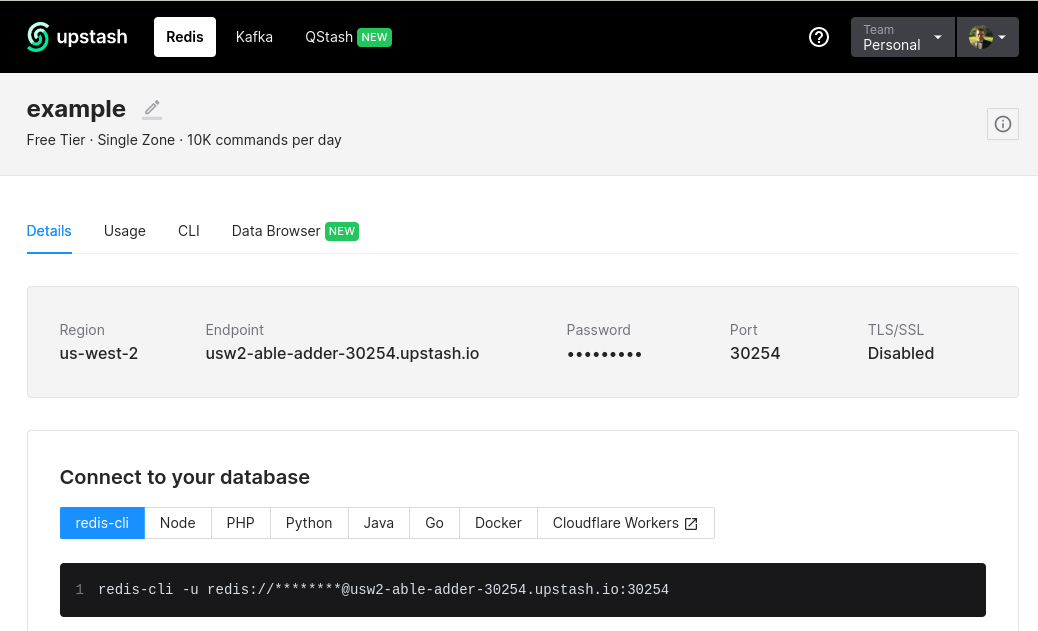
I.e. in the example above I quickly spun up a Redis instance, from here I'm able to copy the Redis URL
redis-cli -u redis://******@usw2-able-adder-30254.upstash.io:30254
Updating project settings
At this point we're ready to update our broker URL in blog/settings.py to match our Redis URL.
In my case because I'm running Redis locally on my machine, I'm going to use redis://
CELERY_BROKER_URL = "redis://"
And run:
pipenv run celery -A blog worker -l INFO
Celery is smart enough to fall-back to a default hostname and port when not specified in the BROKER_URL, as it evident from the logs:
 -------------- celery@fedora v5.2.7 (dawn-chorus)
--- ***** -----
-- ******* ---- Linux-5.19.8-200.fc36.x86_64-x86_64-with-glibc2.35 2022-09-17 15:10:35
- *** --- * ---
- ** ---------- [config]
- ** ---------- .> app:         blog:0x7f9aeee67a90
- ** ---------- .> transport:   redis://localhost:6379//
- ** ---------- .> results:     disabled://
- *** --- * --- .> concurrency: 8 (prefork)
-- ******* ---- .> task events: OFF (enable -E to monitor tasks in this worker)
--- ***** -----
 -------------- [queues]
                .> celery           exchange=celery(direct) key=celery


[tasks]
  . blog.celery.debug_task

[2022-09-17 15:10:35,249: WARNING/MainProcess] No hostname was supplied. Reverting to default 'localhost'
[2022-09-17 15:10:35,249: INFO/MainProcess] Connected to redis://localhost:6379//
Note: if you forget to configure the CELERY_BROKER_URL you'll likely be greeted by the following error:
[2022-09-17 14:48:55,224: WARNING/MainProcess] No hostname was supplied. Reverting to default 'localhost'

 -------------- celery@fedora v5.2.7 (dawn-chorus)
--- ***** -----
-- ******* ---- Linux-5.19.8-200.fc36.x86_64-x86_64-with-glibc2.35 2022-09-17 14:48:55
- *** --- * ---
- ** ---------- [config]
- ** ---------- .> app:         blog:0x7fb8a1067a90
- ** ---------- .> transport:   amqp://guest:**@localhost:5672//
- ** ---------- .> results:     disabled://
- *** --- * --- .> concurrency: 8 (prefork)
-- ******* ---- .> task events: OFF (enable -E to monitor tasks in this worker)
--- ***** -----
 -------------- [queues]
                .> celery           exchange=celery(direct) key=celery


[tasks]
  . blog.celery.debug_task

[2022-09-17 14:48:55,443: ERROR/MainProcess] consumer: Cannot connect to amqp://guest:**@127.0.0.1:5672//: [Errno 111] Connection refused.
Trying again in 2.00 seconds... (1/100)
This is because the default broker URL: amqp://guest:**@127.0.0.1:5672//:
isn't available. For this to work we'd have to configure a local instance of RabbitMQ.
Monitoring Celery Workers
Once you're started your celery worker(s), you can monitor their status with:
pipenv run celery -A blog status
i.e:
$ pipenv run celery -A blog status
->  celery@fedora: OK

1 node online.
Or via the celery shell:
pipenv run celery -A blog shell
>>> app.control.inspect().stats()
{'celery@fedora': {'total': {}, 'pid': 44068, 'clock': '7', 'uptime': 7, 'pool': {'max-concurrency': 8, 'processes': [44070, 44071, 44072, 44073, 44074, 44075, 44076, 44077], 'max-tasks-per-child': 'N/A', 'put-guarded-by-semaphore': False, 'timeouts': [0, 0], 'writes': {'total': 0, 'avg': '0.00', 'all': '', 'raw': '', 'strategy': 'fair', 'inqueues': {'total': 8, 'active': 0}}}, 'broker': {'hostname': 'localhost', 'userid': None, 'virtual_host': '0', 'port': 6379, 'insist': False, 'ssl': False, 'transport': 'redis', 'connect_timeout': 4, 'transport_options': {}, 'login_method': None, 'uri_prefix': None, 'heartbeat': 120.0, 'failover_strategy': 'round-robin', 'alternates': []}, 'prefetch_count': 32, 'rusage': {'utime': 0.9573699999999999, 'stime': 0.196535, 'maxrss': 57784, 'ixrss': 0, 'idrss': 0, 'isrss': 0, 'minflt': 66085, 'majflt': 0, 'nswap': 0, 'inblock': 0, 'oublock': 0, 'msgsnd': 0, 'msgrcv': 0, 'nsignals': 0, 'nvcsw': 52, 'nivcsw': 19}}}
Triggering Tasks
We can now start to trigger tasks via the celery shell. In a process process run:
pipenv run celery -A blog shell
Launching the shell session gives us access to all the currently registered tasks, you can see whats available with:
>>> app.control.inspect().registered()
{'celery@fedora': ['blog.celery.debug_task']}
As you can see from the namespace, this is the same task we defined in blog/celery.py
@app.task(bind=True)
def debug_task(self):
    print(f"Request: {self.request!r}")
We can trigger the debug_task with:
>>> debug_task.delay()
<AsyncResult: 55d109d4-cef1-477a-bbbf-6baf5acf2857>
If you check back on your celery worker process this task should have been received + executed
[2022-09-17 15:45:31,460: INFO/MainProcess] Task blog.celery.debug_task[55d109d4-cef1-477a-bbbf-6baf5acf2857] received
[2022-09-17 15:45:31,461: WARNING/ForkPoolWorker-8] Request: <Context: {'lang': 'py', 'task': 'blog.celery.debug_task', 'id': '55d109d4-cef1-477a-bbbf-6baf5acf2857', 'shadow': None, 'eta': None, 'expires': None, 'group': None, 'group_index': None, 'retries': 0, 'timelimit': [None, None], 'root_id': '55d109d4-cef1-477a-bbbf-6baf5acf2857', 'parent_id': None, 'argsrepr': '()', 'kwargsrepr': '{}', 'origin': 'gen42154@fedora', 'ignore_result': False, 'properties': {'correlation_id': '55d109d4-cef1-477a-bbbf-6baf5acf2857', 'reply_to': 'a9e82ead-2c56-3682-883c-421d7ac5d9d1', 'delivery_mode': 2, 'delivery_info': {'exchange': '', 'routing_key': 'celery'}, 'priority': 0, 'body_encoding': 'base64', 'delivery_tag': '5191f0a6-d448-4fd8-ace1-a23fa674c25a'}, 'reply_to': 'a9e82ead-2c56-3682-883c-421d7ac5d9d1', 'correlation_id': '55d109d4-cef1-477a-bbbf-6baf5acf2857', 'hostname': 'celery@fedora', 'delivery_info': {'exchange': '', 'routing_key': 'celery', 'priority': 0, 'redelivered': None}, 'args': [], 'kwargs': {}, 'is_eager': False, 'callbacks': None, 'errbacks': None, 'chain': None, 'chord': None, 'called_directly': False, '_protected': 1}>
[2022-09-17 15:45:31,461: INFO/ForkPoolWorker-8] Task blog.celery.debug_task[55d109d4-cef1-477a-bbbf-6baf5acf2857] succeeded in 0.0006546240001625847s: None
Configure Celery Results Backend (redis)
The debug_taks doesn't return any useful information, but what if we wanted to perform some log running computation and save the results somewhere?
To store results we need to configure a results backend. Luckily, celery supports using redis as both a results backend and a broker, so we can re-use the redis instance we have already.
Note: In part 2 I'll be demonstrating how to use django (and it's configured DB instance) as a results backend instead.
In blog/settings.py define CELERY_RESULT_BACKEND (it should be the same value as CELERY_BROKER_URL)
CELERY_BROKER_URL = "redis://localhost/0"
CELERY_RESULT_BACKEND = "redis://localhost/0"
Triggering Tasks (With Reults)
Lets define a new example function in blog/celery.py called square.
@app.task(bind=True)
def square(self, n):
    return n * n
After making this change you will need to restart celery. Once you've done so the new blog.celery.square
task should appear under [tasks]:
 -------------- celery@fedora v5.2.7 (dawn-chorus)
--- ***** -----
-- ******* ---- Linux-5.19.8-200.fc36.x86_64-x86_64-with-glibc2.35 2022-09-17 15:52:57
- *** --- * ---
- ** ---------- [config]
- ** ---------- .> app:         blog:0x7f48c5467a90
- ** ---------- .> transport:   redis://localhost:6379/0
- ** ---------- .> results:     disabled://
- *** --- * --- .> concurrency: 8 (prefork)
-- ******* ---- .> task events: OFF (enable -E to monitor tasks in this worker)
--- ***** -----
 -------------- [queues]
                .> celery           exchange=celery(direct) key=celery


[tasks]
  . blog.celery.debug_task
  . blog.celery.square
Just as before, (inside a celery shell process) lets trigger our new square task:
>>> res = square.delay(5)
>>> res.get()
25
Note: If forget to configure a result backend you'll encounter an error like this:
Traceback (most recent call last):
  File "<console>", line 1, in <module>
  File "/home/jackevans/.local/share/virtualenvs/blog-ZV8xlUiZ/lib/python3.10/site-packages/celery/result.py", line 224, in get
    return self.backend.wait_for_pending(
  File "/home/jackevans/.local/share/virtualenvs/blog-ZV8xlUiZ/lib/python3.10/site-packages/celery/backends/base.py", line 756, in wait_for_pending
    meta = self.wait_for(
  File "/home/jackevans/.local/share/virtualenvs/blog-ZV8xlUiZ/lib/python3.10/site-packages/celery/backends/base.py", line 1087, in _is_disabled
    raise NotImplementedError(E_NO_BACKEND.strip())
NotImplementedError: No result backend is configured.
Please see the documentation for more information.
Next Time
This concludes part 1, in part 2 we've explore using the
django-celery-results package to configure Djagno as a results backend and
discuss cases where this might be necessary.